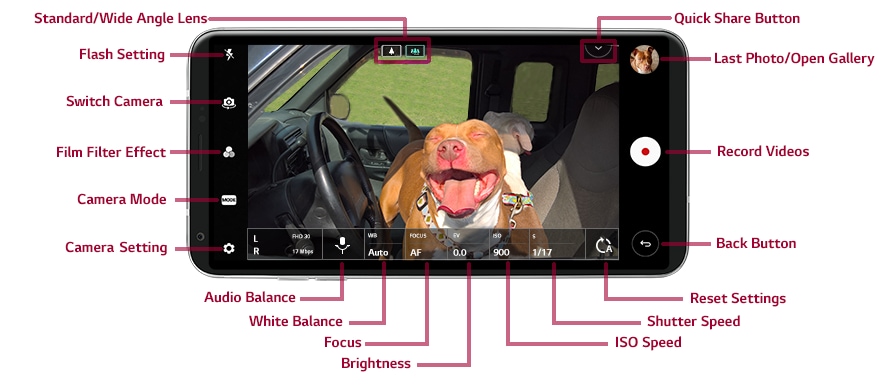
With the LG V30 Camera, capture what you see, how you want to see it with enhanced speed and accuracy even in low light.
The V30 includes multiple rear facing cameras to always get the best shot, these include:
- Standard camera
 - 16MP Standard Angle Lens
 - Wide angle camera
 - 13MP Wide Angle Lens
Note: Some Settings, Menus, or Icons may differ from that of your device depending on your software version and wireless service provider.
Auto Mode 
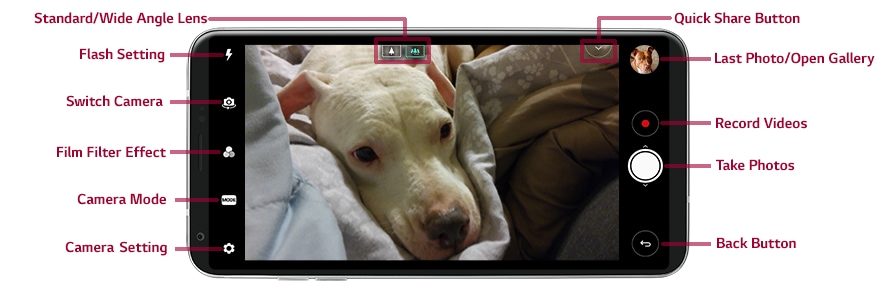
Take a Photo or Video
-
Open the Camera
, then tap MODE
 > Auto to change the mode.
 -
Tap
to switch to the standard camera or to switch to the wide angle camera. -
Tap the screen to focus the camera.
-
Tap Take Photo or tap Volume Up or Volume Down button to take a photo. Tap Record Video to start recording.
-
How do I change the Flash mode?
-
Tap on Flash mode
 to cycle though the settings; Flash Off
  , Flash On , Auto Flash
  .
.
Note: If HDR is set to ON, you cannot use the flash or change the setting.
-
-
How do I take a Selfie?
-
Tap on
 to switch to the front camera.
 Use the slider on screen to adjust the brightness of the photo.
When using the front facing camera, additional options available under the Gear icon are:
- Selfie Shot: Take a selfie by selecting between Gesture shot and Auto shot.
- Gesture View: Allows you to view the photo immediately after taking it.
- Save as Flipped: Save as flipped images after taking selfies.
-
-
How do I change the look of my photos?
-
Tap on Film Filter Effect
 to apply a color or look to your photos prior to taking a picture or video.
-
-
How do I change the camera settings?
Tap on the Gear icon
 to change the following settings:
- Photo Size: Select the desired value for the aspect ratio and size of your photos.
- Video Resolution: Select the desired value for resolution and size of your videos.
- Camera roll: Display your recent photos and videos along the side of the screen (only available for select resolution/camera mode options).
- HDR: Obtain photos in vivid colors and get compensated effects even when they are taken against the light. These functions are provided by the high dynamic range (HDR) technology equipped in the camera.
- Timer: Set the timer to automatically take photos after a specified period of time.
- Voice Shutter: Take photos with voice commands
- Tracking Focus: Enable the camera to remain focused on the subject you touch on the screen, even if the subject is moving (when using the standard camera).
- Steady Recording: Minimize motion blur while recording a video.
- Covered Lens: Lets you know when the rear wide-angle lens is covered.
- Tag Locations: Save the image with GPS location data.
- Grid: Display guide grids so that you can take photos or record videos based on the horizontal and vertical reference lines.
- Add Signature: Display a personalized signature on the photos.
- Storage: Select if you want to store the pictures and videos in the Internal storage or SD card (available when memory card is inserted).
- Simple View: Hide all menus from the camera screen.
- Help: Provide help information for each camera menu.
Some settings may not be available or differ depending on the camera mode.
Manual Mode 
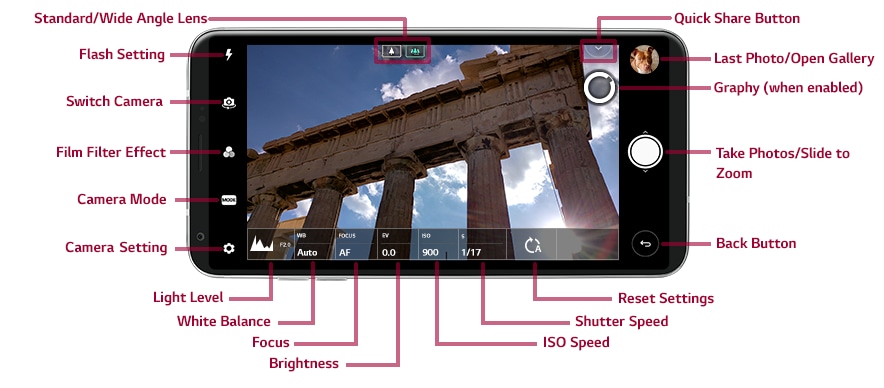
Take a Photo or Video
-
Open the Camera
> Manual to change the mode. -
Tap
to switch to the standard camera or to switch to the wide angle camera. -
Tap the screen to focus the camera.
-
Tap Take Photo or tap Volume Up or Volume Down button to take a photo. Slide Take Photo to zoom and out.
-
How do I change the Flash mode?
-
Tap on Flash mode
to cycle though the settings; Flash Off , Flash On , Auto Flash .
-
-
How do I change the look of my photos?
-
Tap on Film Filter Effect
to apply a color or look to your photos live while taking a picture or video. Tap on Graphy for a list of preset camera settings to add even more depth, color or style to your photos
-
-
How do I change the camera settings?
Tap on the Gear icon
to change the following settings:- Photo Size: Select the desired value for the aspect ratio and size of your photos.
- Timer: Set the timer to automatically take photos after a specified period of time.
- Graphy Photos: Adjust the white balance, ISO and shutter speed referring to one of the recommended photos.
- Voice Shutter: Take photos with voice commands
- Tracking Focus: Enable the camera to remain focused on the subject you touch on the screen, even if the subject is moving (when using the standard camera).
- Tag Locations: Save the image with GPS location data.
- Guide: Display guide grids so that you can take photos based on the horizontal and vertical reference lines.
- Save as RAW: The image is stored as a RAW file format so that you can modify it. DNG and JPEG files are created while taking a photo, then saved as a non-compressed high resolution image.
- Covered Lens: Lets you know when the rear wide-angle lens is covered.
- Noise Reduction: Reduce noise at high ISO settings.
- Add Signature: Display a personalized signature on the photos.
- Storage: Select if you want to store the pictures and videos in the Internal storage or SD card (available when memory card is inserted).
- Help: Provide help information for each camera menu.
-
What is Exposure?
Exposure is the amount of light captured to create a photo and it is made up of 3 properties:
- Shutter Speed
- ISO
Example: How you achieve correct lighting through adjusting Shutter Speed:
- Shutter Speed
-
When should I adjust Shutter Speed?
-
When should I adjust ISO settings?
-
What is the Aperture ?
-
What is White Balance?
-
What is White Balance?
-
What are RAW images?
-
What other camera features are there?
Manual Video Mode 
Take a Photo or Video
-
Open the Camera
> Manual (video) to change the mode. -
Tap
to switch to the standard camera or to switch to the wide angle camera. -
Tap the screen to focus the camera.
-
Tap Take Photo or tap Volume Up or Volume Down button to take a photo. Tap Record Video to start recording.
-
How do I change the Flash mode?
-
Tap on Flash mode
to cycle though the settings; Flash Off , Flash On .
-
-
How change the look of my videos?
-
Tap on Film Filter Effect
to apply a color or look to your video prior to recording a video.
-
-
How do I change the camera settings?
Tap on the Gear icon
to change the following settings:- Video Resolution: Select the desired value for resolution and size of your videos.
- Frame Rate: Select the frames per second value.
- Bit Rate: Select the image quality for videos.
- Hi-Fi: Record a video with Hi-Fi quality sound.
- Timer: Set the timer to automatically take a video after a specified period of time.
- Steady Recording: Minimize motion blur while recording a video.
- Covered Lens: Lets you know when the rear wide-angle lens is covered.
- Tracking Focus: Enable the camera to remain focused on the subject you touch on the screen, even if the subject is moving (when using the standard camera).
- Tag Locations: Save the image with GPS location data.
- Grid: Display guide grids so that you can record videos based on the horizontal and vertical reference lines.
- Save as LG-Cine Log: Save a video in LOG file format for tone mapping or color adjustment.
- Storage: Select if you want to store videos in the Internal storage or SD card (available when memory card is inserted).
- Help: Provide help information for each camera menu.
-
What is Exposure?
Exposure is the amount of light captured to create a photo and it is made up of 3 properties:
- Shutter Speed
- ISO
Example: How you achieve correct lighting through adjusting Shutter Speed:
- Shutter Speed
-
When should I adjust Shutter Speed?
-
When should I adjust ISO settings?
-
What is the Aperture ?
-
What is White Balance?
-
What is White Balance?
-
What other camera features are there?
Other Camera Modes 
Choose a Mode to see more info
-
Snap Shot
You can take a photo or record a video and preview it right away.
-
Match Shot
You can take two photos and/or 3-second videos at the same time one by one. You can also use any photo you’ve previously taken.
-
Cine Video
Select an effect to apply to the recording. You can also adjust the vignette and strength for each Cine effect. This feature cannot be changed after you have started recording.
-
Grid Shot
You can take 4 photos or 3-second videos to save as one photo or video.
-
Guide Shot
You can use an image as a guide to take photos with the same composition. Any photo in the Gallery can be used as a guide.
-
Food
You can optimize the quality of your food photos or videos by adjusting the color slide bar and white balance.
-
Slo-mo
You can create an entertaining video by changing the moving speeds of subjects in your video. This feature allows you to record a video at a faster rate of speed and then play it at the standard speed so that the video appears to be slowed down.
-
Time-lapse
You can take a sequence of frames at set intervals to record changes that take place slowly over time, such as cloud movements, celestial motions, traffic, and more.
-
Snap Movie
You can record short video clips and assemble them into a 60-second short film.
-
Panorama
You can create a panoramic photo by moving the camera in one direction to photograph and stitch continuous shots of a wide view.
-
360 Panorama
You can create a 360 degree panorama photo by moving the camera in one direction.
-
Popout
You can take a photo or record a video by using both the standard and wide-angle cameras to record the scenes as if they were put in a frame. The scenes shown in the small, front screen are shot by using the standard camera, and the scenes shown in the large, background screen are shot by using the wide-angle camera. Change the front screen to a different shape or apply various effects to take a personalized photo or video.

Yianni is a Mobile Device expert and author of this help library article. Please leave him feedback below about the page.