
Sound sync makes connecting your Home Theater, Soundbar, and Sound Plate to your LG TV easy and wire free. With Sound Sync, your LG compatible devices can connect with each other using Bluetooth technology, reducing cable clutter, while also synchronizing the audio between devices.
How to connect using Sound Sync
Set up Sound Sync with a Sound Bar or Sound Plate
-
Begin by pressing the Home button on the Magic Remote.
-
Click on the Settings icon in the upper right-hand corner.
-
Click on Sound, and then Sound Out.
-
Change the setting from "TV Speaker" to "LG Sound Sync Wireless".
-
Press Device Selection. (Your TV will begin searching for compatible devices).
-
Press the LG TV Button on the remote control. (The sound bar will now go into pairing mode).
-
It will show up on the screen with the name of the sound bar.
-
Click on the circle next to the name and wait for the Bluetooth connection.
-
It will now appear under "Paired Devices".
-
To remove the speaker from the list, simply click the Trash icon.
Set up Sound Sync with a Home Theater
-
Turn on your Sound Bar.
-
Press the FUNC on the remote control or F on the unit until the correct LG TV is selected.
-
From your TV, Set up LG Sound Sync (Wireless) on the sound settings. Refer to your TV’s instruction manual for detailed steps.
“PAIRED” will appear on your Sound Bar’s display window for about 3 seconds and then you should see “LG TV” on the display window if things are connecting normally.
Having issues with connection?
What Device are you trying to Connect to?
Connecting Your Soundbar or Sound Plate
HDMI (ARC) means High-Definition Multimedia Interface Audio Return Channel. This is a method of transmitting sound from your ARC compatible TV to your Soundbar.
Most Soundbar models support ARC, but it is best to consult the manual to be sure.
To connect your Soundbar using HDMI (ARC):
Note: Simlink will need to be enabled for ARC to function.
- Make sure the Soundbar is powered On.
- Connect an HDMI cable from the HDMI (ARC) output on your TV (usually HDMI 1), to the HDMI input slot on the Soundbar.
- Locate the Sound menu on your TV (differs by model).
- Select Sound Out from the Sound menu.
- Choose Audio Out(Optical/HDMI ARC)from the list.
- Your Soundbar should automatically switch to ARC mode. If not, change the function on the Soundbar to HDMI IN.
Digital Optical cables deliver crystal clear sound using fiber optic technology (uses light to transmit data).
Most TV models support optical output, but it is best to consult the manual to be sure.
To connect your Soundbar using Digital Optical:- Make sure the Soundbar is powered On.
-
Connect an optical cable from the optical output on your device, to the optical input slot
on the Soundbar.
If using a device other than an LG TV, skip to STEP 6.
- Locate the Sound menu on your TV (differs by model).
- Select Sound Out from the Sound menu.
- Choose Audio Out(Optical/HDMI ARC) or Sound Sync(optical) from the list.
- Your Soundbar should automatically switch to optical mode. If not, change the function on the Soundbar to optical.
RCA cables deliver analog stereo sound to your compatible home theater equipment.
Most LG TV models do not support RCA output, but it is best to consult the manual to be sure.
Soundbars do not support RCA connections.
Connecting via Bluetooth is an easy and wireless way to play content from mobile devices through your sound system..
Note: Make sure Bluetooth functionality is enabled on your mobile device before attempting to connect.
To connect your Soundbar using Bluetooth:- Make sure the Soundbar is powered On.
- Switch your Soundbar function to BT or Bluetooth.
- Use your mobile device to scan for available bluetooth devices.
- The name of your Soundbar should be similar to LG-HTS, choose to pair with this device.
- Any audio from your mobile device will now be redirected to your Soundbar.
Sound Sync allows your compatible LG devices to communicate via Bluetooth or Digital Optical connections. Devices connected using Sound Sync will have the ability to be controlled by one remote.
Both the TV and the Soundbar must be LG products and must both support Sound Sync.
To connect your Soundbar using Sound Sync:- Make sure the Soundbar is powered On.
- If using an optical cable, connect the cable from the optical output on the TV to the optical input on the Soundbar.
- Locate the Sound menu on your TV (differs by model).
- Select Sound Out from the Sound menu.
- Choose LG Sound Sync(optical) or LG Sound Sync(wireless) from the list.
- If you choose LG Sound Sync(wireless), choose Device Selection to search for available devices, then select your device.
- Switch your Soundbar input mode to LG TV for wireless connections, or Optical otherwise.
Connecting your Home Theater
HDMI (ARC) means High-Definition Multimedia Interface Audio Return Channel. This is a method of transmitting sound from your ARC compatible TV to your Home Theater.
Most home theater models do not support ARC, but it is best to consult the manual to be sure.
To connect your home theater using HDMI (ARC):
Note: Simlink will need to be enabled for ARC to function.
- Make sure the home theater is powered On.
-
Connect an HDMI cable from the HDMI (ARC) output on your TV (usually HDMI 1), to the HDMI
input slot on the home theater.
Note: Make sure you use the HDMI IN slot, and not the output. If your home theater does not have an HDMI IN, it does not support ARC. - Locate the Sound menu on your TV (differs by model).
- Select Sound Out from the Sound menu.
- Choose Audio Out(Optical/HDMI ARC) from the list.
- Switch your home theater input mode to HDMI ARC.
Digital Optical cables deliver crystal clear sound using fiber optic technology (uses light to transmit data).
Most TV models support optical output, but it is best to consult the manual to be sure.
To connect your Home Theater using Digital Optical:- Make sure the home theater is powered On.
-
Connect an optical cable from the optical output on your device, to the optical input slot
on the home theater.
If using a device other than an LG TV, skip to STEP 6.
- Locate the Sound menu on your TV (differs by model).
- Select Sound Out from the Sound menu.
- Choose Audio Out(Optical/HDMI ARC) or Sound Sync(optical) from the list.
- Switch the function on the home theater to optical.
RCA cables deliver analog stereo sound to your compatible home theater equipment.
Most LG TV models do not support RCA output, but it is best to consult the manual to be sure.
To connect your Home Theater using RCA:- Make sure the home theater is powered On.
-
Connect RCA cables from the RCA output on your device, to the RCA input slot on the home
theater.
Note: Be sure match the color of the wire with the color of the input/output slot.
- Locate the Sound menu on your TV (differs by model).
- Turn off TV Speaker from the Sound menu.
- Switch the function on the home theater to A/V.
Connecting via Bluetooth is an easy and wireless way to play content from mobile devices through your sound system..
Note: Make sure Bluetooth functionality is enabled on your mobile device before attempting to connect.
To connect your Home Theater using Bluetooth:- Make sure the home theater is powered On.
- Switch your home theater mode to Bluetooth.
- Use your mobile device to scan for available bluetooth devices.
- The name of your home theater should be similar to LG-HTS, choose to pair with this device.
- Any audio from your mobile device will now be redirected to your home theater.
Sound Sync allows your compatible LG devices to communicate via Bluetooth or Digital Optical connections. Devices connected using Sound Sync will have the ability to be controlled by one remote.
Both the TV and the home theater must be LG products and must both support Sound Sync.
To connect your Home Theater using Sound Sync:- Make sure the home theater is powered On.
- If using an optical cable, connect the cable from the optical output on the TV to the optical input on the home theater.
- Locate the Sound menu on your TV (differs by model).
- Select Sound Out from the Sound menu.
- Choose LG Sound Sync(optical) or LG Sound Sync(wireless) from the list.
- If you choose LG Sound Sync(wireless), choose Device Selection to search for available devices, then select your device.
- Switch your home theater input mode to LG TV for wireless connections, or Optical otherwise.
-
Other Connection Options
Connect wirelessly using Sound Sync Connecting to your TV using an OPTICAL cableConnecting to your TV using an HDMI cableSIMPLINK functionConnecting an external device using an HDMI cableConnecting an external device using an OPTICAL cableConnecting an external portable deviceConnecting to your home network -
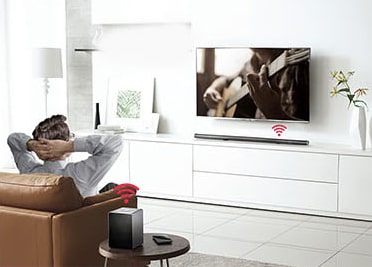
CONNECT WIRELESSLY USING SOUND SYNC
LG Sound Sync technology allows you to link your compatible LG HDTV to your Sound Bar wirelessly using Bluetooth®, reducing cable clutter, while also synchronizing the audio between devices.
Set up Sound Sync with a wireless connection
-
Turn on your Sound Bar.
-
Select LG TV function by using FUNC on the remote control or F on the unit until the correct function is selected.
-
Set up LG Sound Sync (Wireless) on the TV. Refer to your TV’s instruction manual for detailed steps.
“PAIRED” will appear on your Sound Bar’s display window for about 3 seconds and then you should see “LG TV” on the display window if things are connecting normally.
-
-
CONNECTING TO YOUR TV USING AN OPTICAL CABLE
If you wish to use a cable, you can connect your Sound Bar to your TV using an OPTICAL connection.
-
Connect the OPT. IN jack on the back of the unit to OPTICAL OUT jack on the TV using an OPTICAL cable.
-
Set the input source to OPTICAL. Repeatedly press FUNC on the remote control or F on the unit until the function is selected. To directly select the OPTICAL function, press OPTICAL on the remote control.

In the case of some TV models, in order to get sound to play from your Sound Bar, you must select the external speaker option from your TV’s menu.
-
-
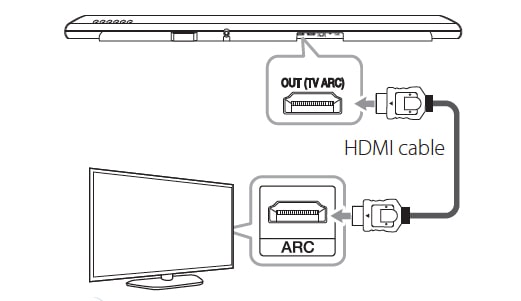
CONNECTING TO YOUR TV USING AN HDMI CABLE
If you wish to use a cable, you can connect your Sound Bar to your TV using an HDMI connection.
If you connect your Sound Bar to a TV that supports HDMI CEC and ARC (Audio Return Channel), you can enjoy audio from your TV through the Sound Bar speakers without connecting the optical cable.
Connect the HDMI OUT (TV ARC) jack on the back of the unit to ARC jack on the TV using an HDMI cable.
NOTE
-
Your television must support the newest HDMI features (HDMI CEC*) / ARC (Audio Return Channel) to fully enjoy the Live broadcasting channel with audio system through an HDMI cable. Unless your TV supports these HDMI features, the audio system should be connected through an OPTICAL cable.
-
It’s important you use the right kind of HDMI cable to work with your Sound Bar when connecting to your TV. If you’re not getting any sound, it could be your HDMI cable. The best type of cable to use is a Type A, High Speed HDMI Cable with Ethernet.
*Trade names for CEC are SimpLink (LG) , Anynet+ (Samsung), BRAVIA Sync (Sony), EasyLink (Philips), etc.
-
-
SIMPLINK FUNCTION
Your LG Sound Bar is equipped with SIMPLINK technology that allows some of its functions to be controlled by your TV’s remote control when connected via HDMI. Some of the controllable functions include powering your Sound Bar on/off and controlling the volume. Refer to your TV owner’s manual for specific details of SIMPLINK function.

-
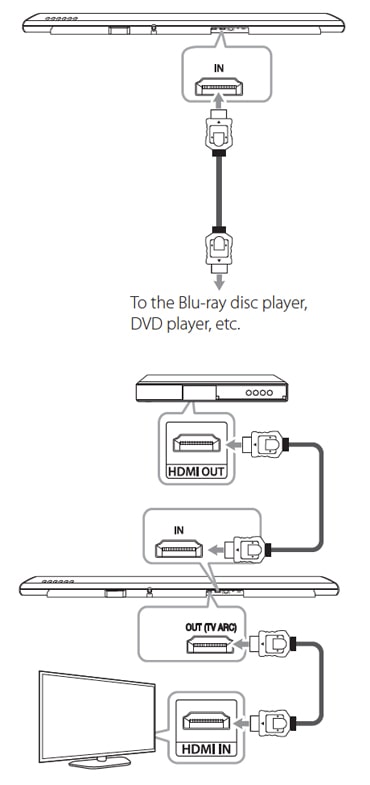
CONNECTING TO AN EXTERNAL DEVICE USING AN HDMI CABLE
If you wish to use a cable, you can connect your Sound Bar to an external device using an HDMI connection.
For enjoying sound only
If you wish to enjoy just sound from an external device, follow these steps to get things connected.
-
Connect your cable into the HDMI IN jack on the back of your Sound Bar to the HDMI OUT jack on your external audio device such as a Blu-ray disc player, DVD player, etc.
-
Set the input source to HDMI IN. Repeatedly press FUNC on the remote control or F on your Sound Bar until the function is selected.
For enjoying both sound and picture
If you wish to enjoy both sound and picture from an external device, follow these steps to get things connected.
-
Connect your cable into the HDMI IN jack on the back of the unit to the HDMI OUT jack on your external device such as a Blu-ray disc player, DVD player, etc.
-
Connect a second cable to the HDMI OUT (TV ARC) jack on the back of your Sound Bar to the HDMI IN jack on your TV.
-
Set the input source to HDMI IN. Repeatedly press FUNC on the remote control or F on your Sound Bar until the function is selected.
-
-
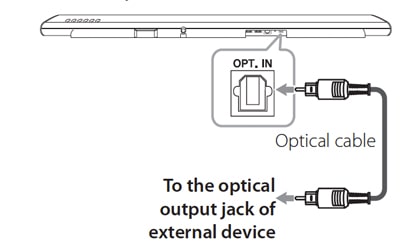
CONNECTING TO AN EXTERNAL DEVICE USING AN OPTICAL CABLE
If you wish to use a cable, you can connect your Sound Bar to an external device using an HDMI connection.
-
Connect an OPTICAL cable to the the OPT. IN jack on the back of your Sound Bar to OPTICAL OUT jack of your TV (or digital device etc.)
-
Select the input source to OPTICAL by pressing FUNC on the remote control or F on your Sound Bar until the function is selected, or, to directly select the OPTICAL function, press OPTICAL on the remote control.
-
Listen to sound from the connected device.
-
Press OPTICAL to exit from OPTICAL and the function will be retuned to previous one.
-
-
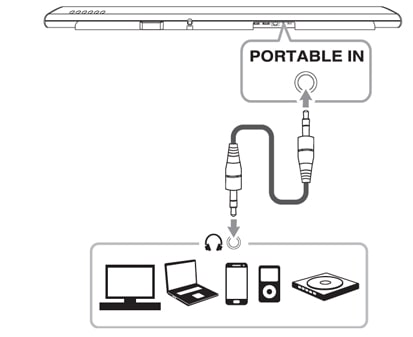
CONNECTING AN EXTERNAL PORTABLE DEVICE
If you wish, you can connect your Sound Bar to an external portable device like a smart phone, computer, or mp3 player.
-
Connect your portable player to the PORTABLE IN input of your Sound Bar.
-
Turn the power on.
-
Select the PORTABLE function by pressing FUNC on the remote control or F on your Sound Bar until the function is selected.
-
Turn on the portable player or external device and start playing it.
-
-
CONNECTING TO YOUR HOME NETWORK
Your Sound Bar can be connected to your home network using either a wired or wireless connection. Once connected, your Sound Bar can seamlessly link to other speakers in other areas and rooms of your house.
Connecting via LAN
When you connect your speaker to your home router using a LAN cable, your LG speaker forms a Mesh Network Connection. This stable connection, when combined with Dual Band Wi-Fi, is designed to minimize interruptions to your music.
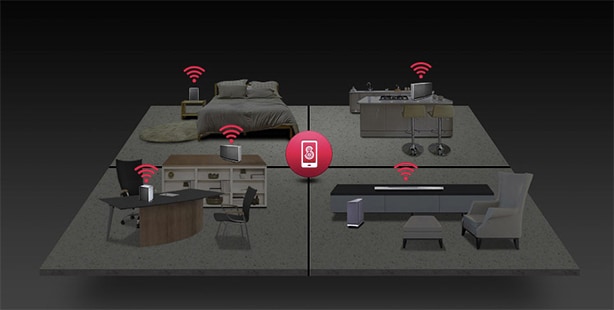
Connecting over Wi-Fi
When a wired connection is unavailable between your speaker and home router, your Sound Bar can stream sound within your home router’s Wi-Fi coverage.
First connect your Sound Bar to your home router wirelessly. Then connect additional Music Flow products to your home network wirelessly.


