Top Deals: Save 30-50% on select home appliances

Top Deals: Save 30-50% on select home appliances
LG Sound Suite FAQ: Setup, Dolby Atmos, Wi-Fi & ThinQ Support
Lossless streaming / Dolby Atmos
• Using Spotify Connect
Spotify supports Lossless Music up to 24bit / 44.1kHz, and lossless playback (24bit / 44.1kHz) is available through Spotify Connect.
• Using TIDAL Connect
TIDAL offers music up to 24bit / 192kHz, and lossless playback (24bit / 96kHz) is available through TIDAL Connect. Dolby Atmos spatial audio is also supported.
To enjoy lossless audio, the following conditions must be met:
- High-quality streaming must be enabled within the TIDAL app.
- Playback must be done using TIDAL Connect.
• Using AirPlay 2
Apple Music provides audio up to 16bit / 44.1kHz, and iOS users can enjoy high-quality audio via AirPlay 2 when streaming to LG Sound Suite. Playback resolution follows the specifications of AirPlay 2.
• Using AirPlay 2
Amazon Music provides audio up to 16bit / 44.1kHz, and iOS users can enjoy high-quality audio via AirPlay 2 when streaming to LG Sound Suite. Playback resolution follows the specifications of AirPlay 2.
• Using Google Cast/Chromecast
Amazon Music provides audio up to 16bit / 44.1kHz, and users can enjoy high-quality audio via Google Cast when streaming to LG Sound Suite. Playback resolution follows the specifications of Google Cast.
• Dolby Atmos-capable products
H7, M7: Support Dolby Atmos on their own
M5: Supports Dolby Atmos only when two units are paired in stereo (A single M5 does not support Dolby Atmos)
• Enjoying Dolby Atmos using mobile streaming apps
✓ Apple Music
After playing a Dolby Atmos track in Apple Music, select the LG Sound Suite device via AirPlay 2 to enjoy Dolby Atmos audio.
✓ Tidal Music
Dolby Atmos content can be enjoyed when played via TIDAL Connect.
✓ How to check if Dolby Atmos is currently playing
- Some streaming apps display a Dolby Atmos badge when Atmos content is being played.
- In the ThinQ App, the audio effect panel (top left) shows the current audio format. If this area displays Dolby Atmos, the content is being played in Dolby Atmos.
- When the H7 is playing Dolby Atmos content, the Dolby logo appears on the OLED display located on the left side of the product.
• Dolby Atmos-supported devices
H7, M7: Support Dolby Atmos on their own
M5: Supports Dolby Atmos only when two units are paired in stereo (A single M5 does not support Dolby Atmos)
• Enjoying Dolby Atmos content from a TV
✓ Playing with only one H7
(1) Connect the TV and the H7 via HDMI eARC.
(2) When Dolby Atmos content is played on the TV, you can enjoy Dolby Atmos sound through the H7.
✓ Playing using the H7 together with M-series speakers
(1) Connect the TV and the H7 via HDMI eARC.
(2) Connect the M-series speakers to the H7 using Dolby Atmos FlexConnect.
(3) Play Dolby Atmos content on the TV. This allows you to enjoy richer Dolby Atmos audio through the combined H7 + M-series setup. (At least two M5 units are required for Dolby Atmos FlexConnect.)
✓ Playing using only M-series speakers
(1) Connect the TV and the M-series speakers via Dolby Atmos FlexConnect.
(2) When Dolby Atmos content is played on the TV, you can enjoy immersive Dolby Atmos audio through the M-series speakers. (At least two M5 units are required for Dolby Atmos FlexConnect.)
TV Setting
Available settings are:
• PCM
• Auto
• Passthrough
(Default setting: Auto)
Please refer to your TV’s manual for details on audio output formats.
With these settings, the TV can send multichannel and Dolby Atmos audio signals to the H7 via eARC, allowing the H7 and M7/M5 speakers to work together to produce optimal immersive sound.
The two options are mostly similar, but differ in the following ways:
• Differences between Auto and Passthrough
- Auto: Mixes in TV sound effects (e.g., Audio Guidance, system notification sounds).
- Passthrough: Sends only the original audio signal with no added effects.
In the H7–M7 or M5 DAFC configuration, Passthrough can reduce audio latency slightly, making it recommended for content like sports.
PCM is not recommended
Selecting PCM limits the TV→H7 output to 2-channel PCM, which significantly reduces immersive audio performance.
Connectivity
1) Turn on the product → ensure the LEDs/displays show normal status.
2) Turn off the old router.
3) Connect your smartphone to the new router’s 2.4GHz or 5GHz or 6GHz network.
4) Open the ThinQ App → the product card will appear offline. Tap the offline product card → Settings → Change Network. Follow the app instructions to update the SSID and password.
Band Steering
Smart Connect
Unified SSID across multiple bands
enabled, devices may automatically switch between 2.4G ↔ 5G ↔ 6G, between nodes, or between channels. This can cause the following issues:
• Only 1–2 devices connect when powered on; others fail to connect.
• The connected devices change every time.
• Intermittent dropouts/latency when forming or using a DAFC group.
Recommended settings in this case
• Router settings
- Turn OFF Band Steering / Smart Connect / Unified SSID.
- Separate SSIDs for each band (e.g., Home_24, Home_5G, Home_6G).
• Product / Mobile settings
- Connect H7 / M7 / M5 / W7 / TV all to the same SSID 2.4GHz recommended
• If your router has Band Steering, Smart Connect, Unified SSID, or MLO (Multi-Link Operation) enabled, turn these features OFF.
• Separate the 2.4G / 5G / 6G bands into individual SSIDs (e.g., Home_24, Home_5G, Home_6G).
• If the router is using a Hidden SSID setting, disable it.
• Reset the product (refer to the manual for the reset procedure).
• Reconnect the device to the network using the ThinQ App.
• Ensure that your smartphone and the product are connected to the same router.
Recommended Wireless Settings Guide
• To use all features, including Dolby Atmos FlexConnect, in the most stable manner, please configure your router and connect your smartphone/product as follows:
• If your router has Band Steering / Smart Connect / unified SSID / MLO (Multi-Link Operation) enabled, please turn these features OFF.
• Separate 2.4 GHz, 5 GHz, and 6 GHz into individual SSIDs (e.g., Home_24 / Home_5G / Home_6G).
• Set the router’s Wi‑Fi to 2.4 GHz or 5 GHz non‑DFS channels (36 / 40 / 44 / 48 / 149 / 153 / 157 / 161).
• Connect both your smartphone and the product to the same 2.4 GHz or 5 GHz or 6GHz
Speaker Settings
• Changing the front-left OLED display settings
- Using the Remote Control
Press and hold the Settings button on the remote until “Display” appears on the H7’s screen. Use the Up/Down buttons to select one of the following:
Auto-Display (automatic brightness)
Off-Display (automatic off)
On-Display (always on)
- Using the ThinQ App
Select the product in the app → tap the Settings icon (top right) → Other Settings → LED/Display. Choose one of the following options:
Auto-Display
Off-Display
On-Display
(Auto-Display: dims after 20 seconds / On-Display: stays bright / Off-Display: turns off after 20 seconds)
• Changing the lower-center LED lighting bar
✓ Lighting On/Off
- Using the Remote Control
Press the lighting button (light-bulb icon) briefly to toggle lighting On/Off.
- Using the ThinQ App
Select the product → tap Lighting at the bottom → use the Ambient Lighting or Standby Lighting On/Off toggles.
✓ Changing the lighting color
- Using the ThinQ App
Select the product → tap Lighting → double-tap one of the four default color options under Ambient Lighting. A color palette / slider will appear, allowing you to adjust and choose your preferred lighting color.
- Using the ThinQ App
After selecting the product in the app, tap “Lighting” in the center of the main screen. You can control Lighting On/Off and other lighting-related options. If you double-tap one of the four default color options in the Lighting menu, a color palette/slider will appear, allowing you to choose the desired lighting color.
Even if the lighting is turned Off, lighting feedback such as volume adjustment or Wi-Fi connection indicators will continue to operate.
• How to exit Demo Mode on the H7
Method 1) Press and hold the Input button on the H7 main unit for 10 seconds.

Method 2) Press and hold the Wi-Fi button on the H7 main unit for 5 seconds.
The status lighting bar will blink white, indicating that Demo Mode has been disabled and all wireless network settings on the device have been reset.

• How to exit Demo Mode on the M7/M5
Method 1) Press and hold the Play/Pause button on the M7/M5 for 10 seconds.

Method 2) Press and hold the power button on the rear of the M7/M5 for 10 seconds.
The status lighting bar will blink white, indicating that Demo Mode has been disabled and all wireless network settings of the device have been reset.
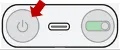
• How to exit Demo Mode on the W7
Method) Press and hold the top button on the W7 for 10 seconds.
Dolby Atmos FlexConnect
LG TVs that support Dolby Atmos FlexConnect:
• 2025 Series - OLED G5, C5
• 2026 Series - OLED W6, G6, C6, C6H, B6, B6E; MRGB95; QNED- 100QNED84BU, 75QNED85BUA, 65QNED85BUA, 85QNED84BAA, 75QNED84BAA, 65QNED84BAA
※ DAFC support for the QNED 85B and QNED 82B may be available in some countries but not in others, so please make sure to check the specifications for your specific country.
By connecting the H7 to your TV via HDMI ARC, the H7 can serve as the FlexConnect main device and pair with the M7 or M5 speakers. This allows you to build out a more immersive, expanded spatial audio setup.
By connecting the H7 to your TV via HDMI ARC, the H7 can serve as the FlexConnect main device and pair with the M7 or M5 speakers. This allows you to build out a more immersive, expanded spatial audio setup.
So while the speakers connect wirelessly within the system, the H7 itself still requires an HDMI connection to the TV.
If you’re running DAFC with the H7 as the leader, the TV speakers won’t output sound. In that setup, the H7 and M7 speakers handle the channel roles and work together to deliver the full audio experience.
1. The TV microphone switch is turned off → Please turn the TV’s microphone switch On.
2. High ambient noise level during calibration → If noise occurs while the calibration sound is being played, a calibration error may occur. For accurate calibration, please ensure that no noise is generated during the calibration process.
3. When the Sound Suite products are placed behind the TV → Please make sure that the Sound Suite M7/M5 speakers are not positioned behind the TV.
4. When the product is connected to a DFS channel on the router → In the router settings, please disable DFS and set the wireless channel to a standard 5 GHz channel (36/40/44/48/149/153/157/161) with a fixed channel setting. If DFS channels are enabled, the router’s channel may change frequently. Therefore, for stable wireless performance, connection via DFS channels is not recommended.
5. Weak signal between the product and the router → Please keep the distance between the product and the router as close as possible.
① Switching Some Speakers from a DAFC Group to Standalone Mode
First, make sure the speakers are currently connected as a DAFC group. On the speakers you want to use in Stereo mode, change the input to Wi-Fi mode using either the speaker’s Input button, or ThinQ app > choose speaker > Input mode. When switched to Wi-Fi mode, the speakers are automatically removed from the DAFC group and change to Standalone Wi-Fi mode.
② Setting Two Standalone Speakers to Stereo Mode
In the ThinQ app, select the two speakers that are now in Standalone Wi-Fi mode. Set them to Stereo mode. Once configured, the two speakers will operate as stereo speakers.
③ Re-adding Stereo Speakers to the DAFC Group
While using the speakers in Stereo mode, change the input of both speakers to DAFC mode. The two speakers will be automatically reconnected to the DAFC group.
④ Automatic Stereo Operation When Switching Back to Standalone Mode
If the two speakers that have rejoined the DAFC group are simultaneously switched to Wi-Fi mode, they will automatically operate in Stereo mode without requiring any additional setup.
ThinQ App
Case 1) More than one router in the home uses the same SSID
If there are two or more routers broadcasting the same SSID, your smartphone may connect to a different router than the one your Sound Suite product is registered to. In this situation, the product may appear offline in the app. To control the product, your smartphone must be connected to the same router as the Sound Suite device.
✓ Recommended action
Separate the SSIDs of your routers (recommended). Set different SSIDs such as Home_Main / Home_Ext. Please ensure that both the smartphone and the product connect to the correct, same SSID.
Case 2) Weak Wi-Fi signal
If Wi-Fi signal strength is low, the product may appear offline.
✓ Recommended action
Place the router closer to both the smartphone and the Sound Suite device so that both connect to the same router with the strongest signal.
If the issue persists, reset the network settings.
✓ Recommended steps
- Move your smartphone closer to the router you want to connect to the Sound Suite device.
- Turn Wi-Fi off and on again on your smartphone. The smartphone will reconnect to the correct router automatically.
How to connect the W7
• [Connecting to H7]
To connect the W7 to the H7, you need to add it to the H7 group within the H7 product card in the ThinQ app.
※ In the LG ThinQ app, go to the H7 product card → [Dolby Atmos FlexConnect] → [Edit Group], then add the W7 from that screen. For detailed connection steps, please refer to page 11 of the W7 manual (model: W7.USALLK), under “Installing the LG ThinQ app and registering the product.”
• [Connecting to a TV]
To connect the W7 to a TV, go to the TV settings and select Sound Out → Dolby Atmos FlexConnect, then follow the on-screen instructions.
How to control the W7
• [When connected to H7]
Since the W7 operates as a companion device to the H7, all settings and controls are managed within the H7 product card in the ThinQ app. (The W7 does not appear as a separate device.) Currently available control: Adjusting the W7 volume level.
• [When connected to a TV]
Currently, the W7 volume is linked to the TV’s main volume. A feature to adjust the W7 volume independently through the TV app is planned for a future software update (H2).
※ When connected to a TV, the W7 cannot be registered or controlled through the ThinQ app.
1. Check Wi-Fi signal strength
If the Wi-Fi signal between the router and the product/mobile device is weak, a stable connection may not be possible. Please check the router’s signal strength using your mobile phone near the product. If the signal is weak, move the router closer to the product.
2. Check router band and SSID settings
Connection is not supported when the router is set to a 6 GHz band. In the router settings, please separate the 2.4 GHz / 5 GHz / 6 GHz bands into individual SSIDs (e.g., Home_24, Home_5G, Home_6G). Connect the product to a 2.4 GHz or 5 GHz (Non-DFS) band. Supported Non-DFS channels: 36 / 40 / 44 / 48 / 149 / 153 / 157 / 161.
3. Resetting the product
Resetting the product may also help.
- M7 / M5: Press and hold the power button on the rear of the product for about 10 seconds until a chime sounds and the reset begins.
- H7: Press and hold the Wi-Fi button until “Reset” appears on the display.
- W7: Press and hold the circular button on the top of the product for about 10 seconds.
Features
For an even fuller sound, you can wirelessly pair two identical M7 or M5 speakers in stereo mode. In that setup, simply connect the “master” speaker to your computer via USB, and you’ll get a richer stereo listening experience.
- M7: Features a woofer and 3 full-range speakers for an immersive 2.1.1 configuration in each speaker. M7 supports DAFC with just one unit. M5: A compact yet dynamic model featuring a woofer and dual tweeters in a 1.1.1 configuration. Stereo sound is not supported in a single unit. To achieve full DAFC functionality, two units are required
- M5: A compact yet dynamic model featuring a woofer and dual tweeters. To achieve full DAFC functionality, two units are required
While the H7 Sound Suite H7 does not support HDMI pass-through, you can still enjoy gaming experience by using the setup below.
Recommended setup: Connect your game console directly to the TV’s HDMI input, and then connect the TV to the H7 via eARC. (Console → TV → H7 via eARC)
With this configuration:
- The TV will handle gaming performance features such as 4K 60/120 Hz, VRR, and ALLM (depending on the TV’s capabilities).
- The H7 will receive the audio signal from the TV and reproduces it in high quality, including Dolby Atmos and Dolby Atmos FlexConnect, providing an immersive audio experience for games.
If you would like to use Cast Service to play music individually on each speaker, please first disconnect the DAFC or Stereo configuration, and then cast to each speaker separately as an individual device.
Recommended Wi-Fi Router Settings
Router settings, firmware updates, or changes to the Wi-Fi password can be performed through the configuration webpage or dedicated app provided by the router manufacturer. For more information, please refer to the router’s user manual or contact the manufacturer.
※ After changing the router settings, you may need to remove the saved network from devices that were previously connected to the network. When the devices reconnect, the router’s new settings will be applied.
• Network Name (SSID)
It is recommended to assign different network names to the 2.4GHz, 5GHz, and 6GHz bands. An SSID (Service Set Identifier) is the name used to identify a network. Devices searching for Wi-Fi networks recognize available networks by their SSIDs, which are displayed in the Wi-Fi network list.
Please ensure that each frequency band supported by the routers connected to the network uses a unique SSID. It is recommended to configure separate SSIDs for the 2.4GHz, 5GHz, and 6GHz bands. If the same SSID is used across all bands, the router’s operating channel may change dynamically during product use after connection, which can result in unstable connectivity.
Example: After registering the product in the ThinQ app, the product may suddenly appear offline, or the DAFC connection may be disconnected.
• Band
Sound Suite supports 2.4GHz, 5GHz, and 6GHz, Wi-Fi connections. For the most stable wireless performance, a 2.4GHz Wi-Fi connection is recommended, especially in larger spaces or environments with physical obstacles.
* Dolby Atmos FlexConnect (DAFC) & Stereo Pairing: DFS Not Supported
Features that require device-to-device communication—such as DAFC mode or Stereo pairing (two-speaker pairing)—do not support DFS channels to ensure stable wireless performance.
Therefore, these features must be used while connected to the router’s non-DFS 5GHz channels (36 / 40 / 44 / 48 / 149 / 153 / 157 / 161).
• When there are two or more routers in the home
If the routers are not configured to operate in Mesh or Repeater mode, it is recommended to assign a different SSID to each router installed in the home.
When multiple networks share the same SSID, devices are more likely to detect and connect to a different network with the same name. In such cases, the device with the ThinQ app installed (such as a smartphone or tablet) may automatically attempt to connect to a router different from the one the product is connected to. As a result, if the product and the mobile device are connected to different routers, the product may appear offline in the ThinQ app.
Before using the product, please ensure that both the product and the device with the ThinQ app installed (smartphone, tablet, etc.) are connected to the same network.
1Dolby, Dolby Atmos and the double-D symbol are registered trademarks of Dolby Laboratories.
2Internet connection and subscriptions to services may be required.
3Some features require 3rd-party subscription or account. Google Cast will be available after June 2026 for H7 Soundbar. Google is a trademark of Google LLC. Apple and Airplay are registered trademarks of Apple Inc.
4Only available with select LG TVs and the H7 Sound Suite Soundbar.
5Requires LG ThinQ® App and smart device with ultra wide band (UWB) technology. Sound Follow is supported on H7 and functions only under an active DAFC connection. DAFC requires a minimum of two M5 speakers or one M7 speaker to be connected
Images may be simulated and dramatized for illustrative purposes. Actual features, functionality, and other product specifications may differ and are subject to change without notice. Prices, promotions, and availability may vary by model, store, and online. Prices subject to change without notice. Quantities are limited. Check with your local retailers for their final price and availability.
- TV & Home Theater
- My Account
- About LG
- Offers
- Articles & Gift Guides
Social Support
 Copyright © 2009-2026 LG Electronics. All Rights Reserved